


Subscribe to our newsletter.
Deep dives into design thinking, creative process, and the intersection of business and aesthetics.
Correct preparation of print data is the basis for successful printing of your order. The print data must respect the requirements of pre-press processing, the technological encounter incorrectly prepared data on a daily basis. Problems arise if we cannot distinguish whether an element in the print data is the intention of the graphic designer or an error.
In this article, you will read the basic technical requirements for the preparation of correct print data, an explanation of basic terms and a demonstration of examples of correct data processing. possibilities of printing and the methods of post-press finishing.
In practice, we prepare digital printing materials only in programs designed for this purpose. If you have the opportunity, we recommend using professional graphic programs: Adobe Illustrator, Adobe InDesign, CorelDraw. Documents prepared in these programs must be converted (ideally by distillation or export) to PDF/X-1a:2001 (ISO standard) ver. 1.3. The PDF file must be composite (not separated) in the CMYK color space or in spot colors (Pantone). DIW s.r.o. fully guarantees the conformity of the resulting printing form with the input PDF documents only if the delivered files complied with the PDF/X-1a standard (otherwise the customer's imprimatur is necessary and decisive).
If you are not a professional graphic designer and you need to design graphics for printing an order on your own, where there are no high requirements for quality and technical execution, it is also possible to prepare print data in online graphic applications.
Excellent applications are, for example, CANVA, BEFUNKY or CRELLO.

What are crop marks?
They are marks that indicate where the printed product is to be cropped to a clean format. The graphic that continues behind these marks is called bleed.
What is bleed?
Graphics reaching beyond the pure format of the printed matter (behind crop marks). The crop tolerance is about +/- 1 mm, and thanks to this overlap, the graphics will go to the edge regardless of the accuracy of the cut. The bleed (overlap of the graphics) should be 3-5 mm on each side.
What is CMYK?
The CMYK color space consists of four basic printing colors. Cyan = cyan, Magenta = magenta, Yellow = yellow and BlacK = black. The letter K for black is also derived from the word Key, as it is the fourth key color that is used to reduce costs when printing black. Black can also be mixed with a combination of CMY, but since it would be necessary to use 3 other colors, black is used directly, which is significantly cheaper. On monitors, everything is always displayed backlit and in the RGB color spectrum. Printed materials are never backlit and therefore it is not technologically possible to ensure the same bright colors as we see on the monitor after printing in CMYK.
In the case of data delivery and the requirement to print in colour spaces other than CMYK (e.g. RGB), it is necessary to inform the DIW printer about this when ordering. Without this information, the data may be automatically converted to CMYK, which may cause the color of the resulting print to change.
Which black to use?
With CMYK, we can print black in several ways:
If we print only texts, we use the composition (0/0/0/100) to make the font sharp.
If we print larger areas, we use the following compositions:
Rich black (typical): (45, 45, 45, 100)
Then there is black, which is only used for license plates that are generated by the system itself. We do not recommend doing this composition, as such a large application of 4 colors causes the print to dry for a long time and at the same time this color can crack. (Registration black: (100, 100, 100, 100))
Summary of Basic Requirements (Graphic Designer Checklist)
✓ Distilled PDF, version 1.3
✓ Composite PDF
✓ Centered PDF
✓ Scale 1:1
✓ PDF without embedded color profiles - often forgotten
✓ All fonts embedded
✓ Color space: CMYK (or CMYK + Pantone if applicable)
✓ Bleed: 3-5 mm
✓ Properly defined TrimBox and BleedBox (trim and bleed boundaries) - often forgotten
Data for metallic printing, partial varnishing, embossing, blind printing and more.
The supplied documents are in a PDF file in a 1:1 ratio
The supplied materials should be supplied in vector (in curves), unless it is a raster (images and the like)
Raster or images used should have a minimum of 300 DPI to maintain quality
Mark the delivered documents with the exact dimensions and a clear name, e.g. invitation, announcement, name tag, etc.
The graphic must contain crop marks that define the final size (see markings in the example)
Bleed min. 3 mm beyond the edge (see markings in the example). If the graphic extends to the edge of the final size, a bleed is used to avoid white edges when cutting, i.e. the graphic continues 3 mm beyond the final cut.
When using metallic printing using the so-called foiling technique, without using a die, the accuracy of the metallic effect on the printed surface is +/- 1 mm. Therefore, the graphics must also be adjusted to this tolerance. In the case of a requirement for precise registration, we recommend embossing in combination with offset printing.
In the supplied PDF data, the number of required pages/sheets should always be:
1st page preview of the final graphics - printed graphics together with foiling or other surface treatment
2nd side graphics that will only be printed (can be in color, depending on the requirement)
3rd side only graphics intended for foiling or other surface treatment in 100% black
Additional Requirements and Recommendations
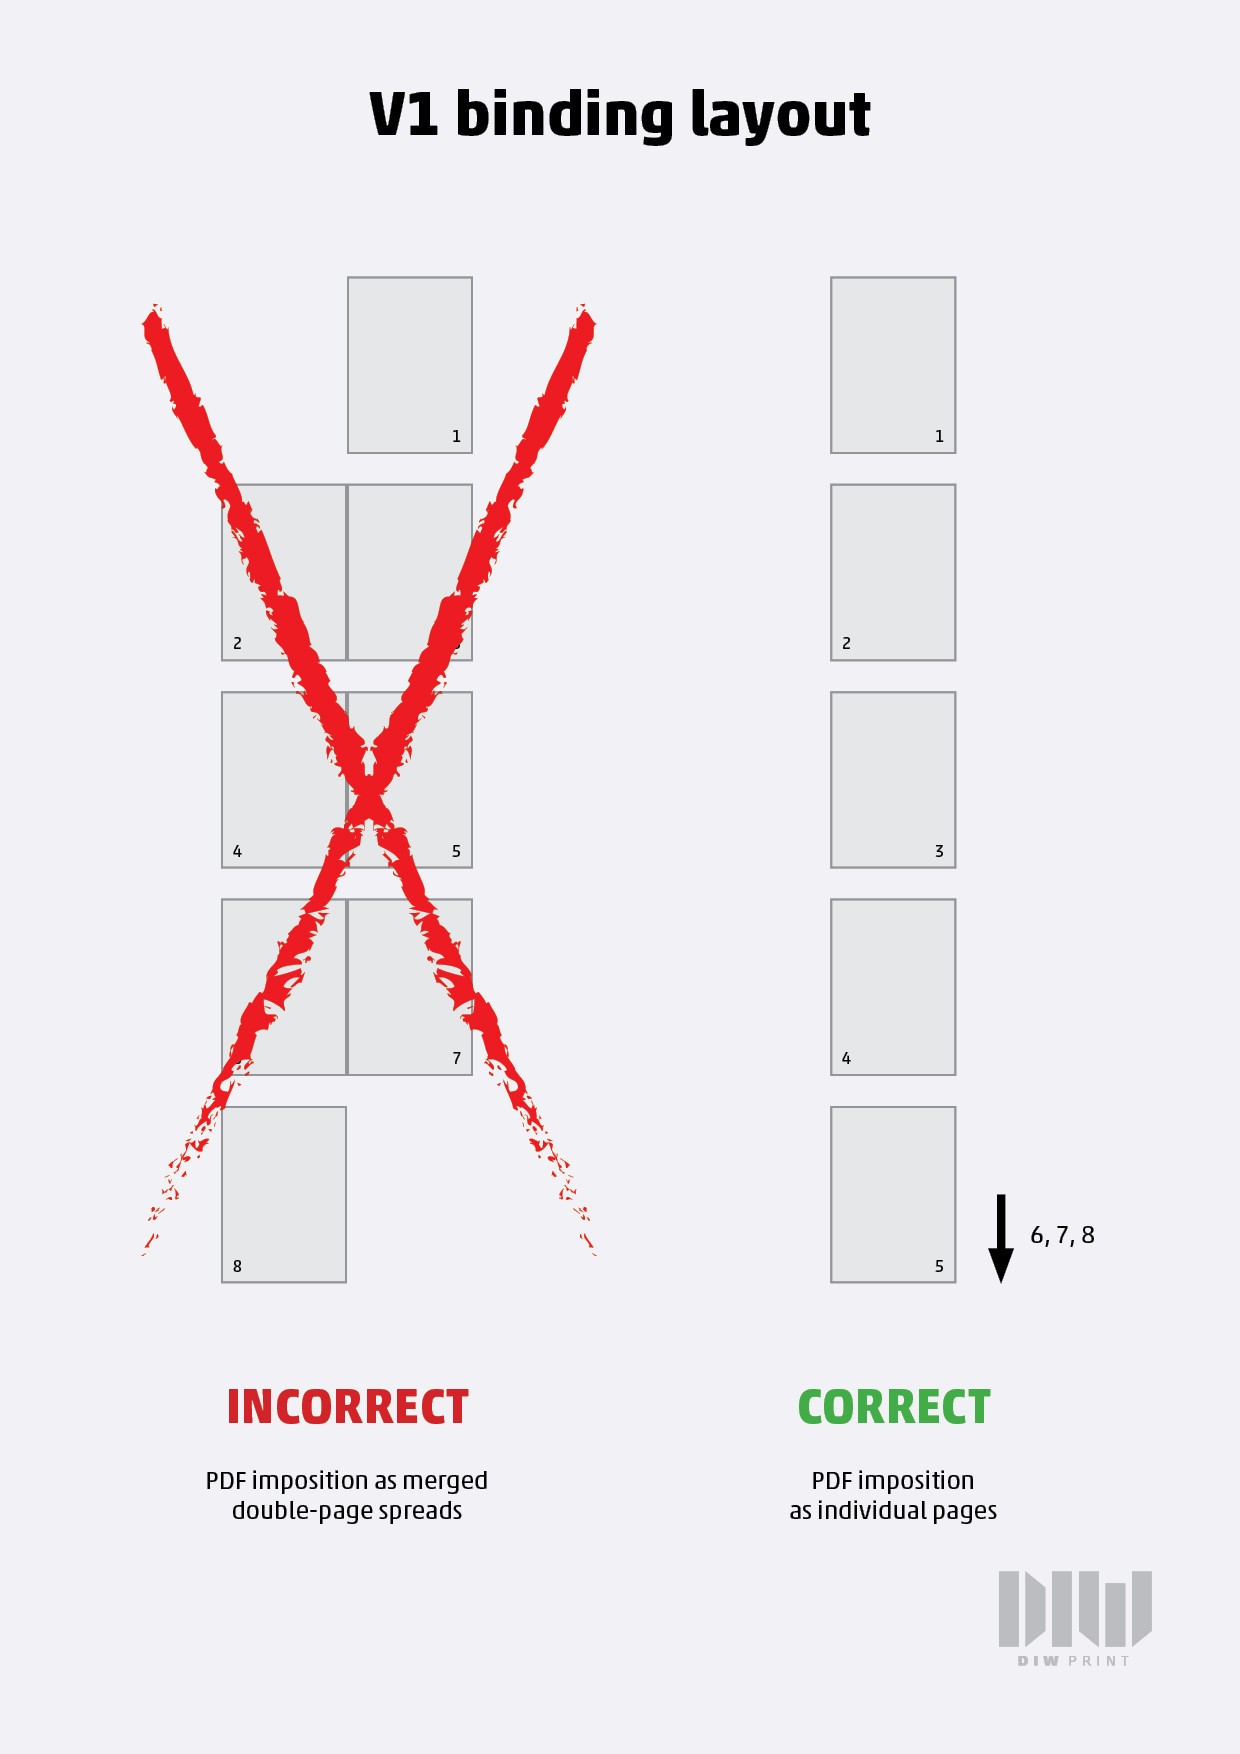
✓ For saddle-stitch and V1 binding: do not impose pages side-by-side; instead place them in reading order (top-to-bottom sequence as they will be flipped through)
✓ Never impose print data onto a print sheet (no printer’s imposition by the designer)
✓ Pay attention to the safety zone (safe area) during trimming
→ We recommend keeping important elements 4–5 mm inside the trim box (final cut size)
✓ When using metallic printing via foiling (without die-cut/embossing):
→ Expect positioning tolerance of approx. ±1 mm for metallic effects
→ Adapt design accordingly to this tolerance
✓ If precise registration is required:
→ We recommend embossing/foil stamping combined with offset printing for accurate alignment
Correct preparation of print data is the basis for successful printing of your order. The print data must respect the requirements of pre-press processing, the technological encounter incorrectly prepared data on a daily basis. Problems arise if we cannot distinguish whether an element in the print data is the intention of the graphic designer or an error.
In this article, you will read the basic technical requirements for the preparation of correct print data, an explanation of basic terms and a demonstration of examples of correct data processing. possibilities of printing and the methods of post-press finishing.
In practice, we prepare digital printing materials only in programs designed for this purpose. If you have the opportunity, we recommend using professional graphic programs: Adobe Illustrator, Adobe InDesign, CorelDraw. Documents prepared in these programs must be converted (ideally by distillation or export) to PDF/X-1a:2001 (ISO standard) ver. 1.3. The PDF file must be composite (not separated) in the CMYK color space or in spot colors (Pantone). DIW s.r.o. fully guarantees the conformity of the resulting printing form with the input PDF documents only if the delivered files complied with the PDF/X-1a standard (otherwise the customer's imprimatur is necessary and decisive).
If you are not a professional graphic designer and you need to design graphics for printing an order on your own, where there are no high requirements for quality and technical execution, it is also possible to prepare print data in online graphic applications.
Excellent applications are, for example, CANVA, BEFUNKY or CRELLO.
What are crop marks?
They are marks that indicate where the printed product is to be cropped to a clean format. The graphic that continues behind these marks is called bleed.
What is bleed?
Graphics reaching beyond the pure format of the printed matter (behind crop marks). The crop tolerance is about +/- 1 mm, and thanks to this overlap, the graphics will go to the edge regardless of the accuracy of the cut. The bleed (overlap of the graphics) should be 3-5 mm on each side.
What is CMYK?
The CMYK color space consists of four basic printing colors. Cyan = cyan, Magenta = magenta, Yellow = yellow and BlacK = black. The letter K for black is also derived from the word Key, as it is the fourth key color that is used to reduce costs when printing black. Black can also be mixed with a combination of CMY, but since it would be necessary to use 3 other colors, black is used directly, which is significantly cheaper. On monitors, everything is always displayed backlit and in the RGB color spectrum. Printed materials are never backlit and therefore it is not technologically possible to ensure the same bright colors as we see on the monitor after printing in CMYK.
In the case of data delivery and the requirement to print in colour spaces other than CMYK (e.g. RGB), it is necessary to inform the DIW printer about this when ordering. Without this information, the data may be automatically converted to CMYK, which may cause the color of the resulting print to change.
Which black to use?
With CMYK, we can print black in several ways:
If we print only texts, we use the composition (0/0/0/100) to make the font sharp.
If we print larger areas, we use the following compositions:
Rich black (typical): (45, 45, 45, 100)
Then there is black, which is only used for license plates that are generated by the system itself. We do not recommend doing this composition, as such a large application of 4 colors causes the print to dry for a long time and at the same time this color can crack. (Registration black: (100, 100, 100, 100))
Summary of Basic Requirements (Graphic Designer Checklist)
✓ Distilled PDF, version 1.3
✓ Composite PDF
✓ Centered PDF
✓ Scale 1:1
✓ PDF without embedded color profiles - often forgotten
✓ All fonts embedded
✓ Color space: CMYK (or CMYK + Pantone if applicable)
✓ Bleed: 3-5 mm
✓ Properly defined TrimBox and BleedBox (trim and bleed boundaries) - often forgotten
Data for metallic printing, partial varnishing, embossing, blind printing and more.
The supplied documents are in a PDF file in a 1:1 ratio
The supplied materials should be supplied in vector (in curves), unless it is a raster (images and the like)
Raster or images used should have a minimum of 300 DPI to maintain quality
Mark the delivered documents with the exact dimensions and a clear name, e.g. invitation, announcement, name tag, etc.
The graphic must contain crop marks that define the final size (see markings in the example)
Bleed min. 3 mm beyond the edge (see markings in the example). If the graphic extends to the edge of the final size, a bleed is used to avoid white edges when cutting, i.e. the graphic continues 3 mm beyond the final cut.
When using metallic printing using the so-called foiling technique, without using a die, the accuracy of the metallic effect on the printed surface is +/- 1 mm. Therefore, the graphics must also be adjusted to this tolerance. In the case of a requirement for precise registration, we recommend embossing in combination with offset printing.
In the supplied PDF data, the number of required pages/sheets should always be:
1st page preview of the final graphics - printed graphics together with foiling or other surface treatment
2nd side graphics that will only be printed (can be in color, depending on the requirement)
3rd side only graphics intended for foiling or other surface treatment in 100% black
Additional Requirements and Recommendations
✓ For saddle-stitch and V1 binding: do not impose pages side-by-side; instead place them in reading order (top-to-bottom sequence as they will be flipped through)
✓ Never impose print data onto a print sheet (no printer’s imposition by the designer)
✓ Pay attention to the safety zone (safe area) during trimming
→ We recommend keeping important elements 4–5 mm inside the trim box (final cut size)
✓ When using metallic printing via foiling (without die-cut/embossing):
→ Expect positioning tolerance of approx. ±1 mm for metallic effects
→ Adapt design accordingly to this tolerance
✓ If precise registration is required:
→ We recommend embossing/foil stamping combined with offset printing for accurate alignment